Sharkey’s Shootout, Stern Pinball Machine (2000)

Location: Boulder, CO

Symptoms: Ball trough solenoid not working — ball not delivered to shooting lane.

For some reason, this past week I’ve gotten a lot of Stern/Sega pinball machine service calls, and all machines are roughly the same era.

I started a game and no ball was delivered to the shooting lane.  The Dot Matrix Display (DMD) indicated it was ball 1, so the computer thought the ball should have been there.  I checked the flippers and they weren’t working either.  At this point, I suspected a blown fuse.

The flippers, pop bumpers, vertical up-kickers, and ball trough solenoids all are “high current” solenoids and run on 50 volts DC.  I checked fuse F21 on the IO Power Driver board and it was blown.  F21 is a 3 amp slow-blow (time delay) fuse for the 50 volt power supply used on these high current solenoids.

Portion of control board showing F21 and power LEDs (click for full res).

A quick visual check of the various voltages can be made by looking at the bank of power LEDs.

I replaced the fuse and the solenoids began working again.  I did a coil test from the diagnostics menu to see if there were any problems that would have caused the fuse to blow.  I then tested all of the switches.  Not seeing any problems, I concluded it was simply what I call a “fatigued fuse”.

Fuse fatigue occurs if the current in the circuit exceeds the rated value of the fuse for a brief moment.  The F21 fuse is a MDL time delay type of fuse rated at 3 amps.  If 3 amps is passing through the fuse, it won’t blow.  If 4 amps is passing through it, it will blow within an hour. It can handle 6 amps (double) for up to 5 seconds before it blows.  So a fuse like this can handle spikes in current without blowing.  But if coil or a drive transistor shorts out, it will blow protecting the circuit.

During multi-ball, the flippers and bumpers can energize all at the same time causing current spikes much greater than 3 amps.  After years of this, the fuse filament gets weaker and eventually breaks, like a light bulb burning out.

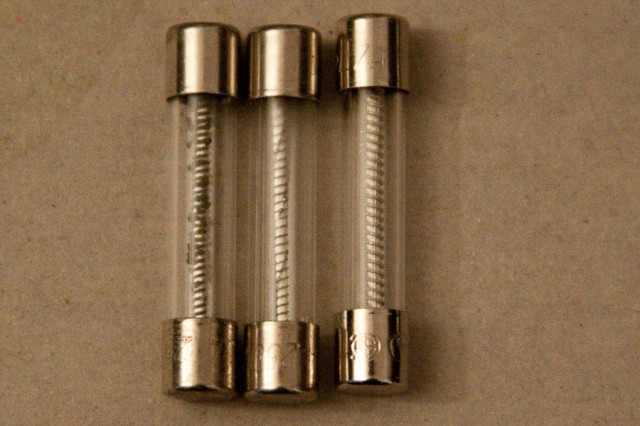
Which fuse is blown? The center fuse. See text.

The fuse on the left sure looks suspect with it’s black residue.  This is a fuse that I took from a high powered coil circuit from a different machine.  It still works.  It still measures good on an ohm meter.  I doubled checked by putting exactly 3 amps through it with my bench power supply.  It’s what I would call “fatigued” and probably will blow in the near future.

The center fuse is blown, but it’s difficult to tell visually.  The fuse on the right is intermittent.  It works for 15 minutes then stops.  If you turn off the power, it will start working again.  It’s the most bizarre behavior I’ve ever seen in a fuse.  It had me thinking the loss of power was somewhere else.

When it comes to fuses in pinball machines, don’t trust your eyes or your meter.  But if the fuse looks like the one on the left, replace it anyway because it’s about to blow.


Star Pool, Williams Pinball Machine (1974)

Location: Broomfield, Colorado

Symptom: Not powering up, not working.

This pinball machine is located in a youth center in a church basement.  No one seemed to know much about it, other than it was probably donated. So it was unknown when it last worked.

Given the age of the machine, before powering it up, I checked the mechanical operation of all of the steppers and visually checked the contacts on the relays and score motor cams.  Several of the steppers were gummed up, but the rest were in good condition.  I rebuilt the steppers and fixed the left slingshot linkage which was binding.

We had to drill out the lock in the back box because no one had a key and we couldn’t find one in the machine.

Once all of the mechanical parts were working freely, I powered it up.  The machine would get stuck in continuous reset mode.  The reset cycle description in the manual was nearly incomprehensible.  So I was on my own.

I checked all of the obvious things, like the score reels resetting to zero, the ball count stepper unit, player count stepper unit, etc.  Everything was being reset and all reset switches were working.  The only weird thing was the credit stepper was stepping up to the maximum allowed credits during reset, when it should be subtracting 1 credit.

It occurred to me to check the coin switches, which I hadn’t checked earlier.  They were a mess.  I think someone thought they could get freeplay mode by bending all of the contacts together on both coin inputs.  Once I got the switch wires and contacts untangled, the machine would reset properly.

I bent the switch contacts on the credit unit to give free plays.

After that, there was still some minor tuning needed and got 98% of it working well.  I discovered a broken switch contact on the Spinner Advance Stepper (EOS). It was broken right at the insulator which prevented me from soldering another contact on.  I am currently researching a replacement switch or contact.

I will update when this is done.

Red & Teds Road Show, Williams Pinball Machine (1994)

Location: Broomfield, CO

Symptoms: Delivers too many balls to the shooter lane.

In this era of pinball machine, the ball trough is monitored by infra-red emitters (LEDs) and detectors (photo transistors).  The detectors are on one side of the trough, the emitters on the other side of the trough.  The game senses the ball when it breaks the beam of light between the two.

The owner had suspected faulty opto boards and had replaced them to no avail.

The test diagnostic (“switch edges”) showed that the Trough Jam opto was not working.  It said there was a trough jam all of the time, even when no balls were present.  This caused the firmware to think the ball was jammed and to try shooting it again into the shooter lane.

Switch Matrix (click for larger and clearer)

Even though the owner had replaced the opto boards, I wanted to start at the beginning and make sure it was working. I checked the signal at the collector of the photo transistor while the owner blocked the light in the trough.  When the light was allowed to hit the detector, the collector measured 12 volts (or close to it).   When the light was blocked, it measured near 0 volts.  This is correct.

Photo-transistor schematic; the red dot indicating the measurement point.

At this point, I thought it would be a good idea to check the other switches in the same row and column as the “Trough Jam” to see if there was a wiring or MPU problem in the switch matrix.  Several other switches in the row did not work.

We spent some time tracing the row wire through the various bundles, not an easy task when 40-50 wires are tie-wrapped together.  The row and column wires are daisy-chained from one switch to the next, zig-zagging across the playfield. We found it broken at the White Standup switch.

I re-soldered the wires to the switch and everything worked.

While the switch edges diagnostic was running, we discovered and unrelated intermittent switch.  We found it easily at one of the eddy current sensors because the LED on the sensor board would blink whenever the connection was lost.  One of the wires was pulling out of the connector.  I tie-wrapped the top of the connector to act as a strain relief and hopefully it will hold.

Counterforce Pinball Machine, Gottlieb

Location:  Highlands Ranch, Colorado

Symptom: No Sound

The owner of this machine had sent both the original CPU board and the Sound board to a pinball repair company located in Illinois.  The owner had found this company listed on E-bay.  He said neither board worked when he received them back.

The owner also had a after-market CPU board made by Ni-Wumpf installed in the game.  It operated without problem (although without sound). So we used Ni-Wumpf to figure out why the sound board wasn’t working.

After checking supply voltages, I traced the audio signal with my oscilloscope.  I could see the audio coming out of the sound generator chip and going into the audio amplifier chip.   But there was nothing coming out of the amp chip (LM380N).  I verified that the output circuit wasn’t shorted, so everything was pointing towards a bad LM380N.   I would need to need to take the board back to my office for repair.

Next, I turned my attention to the original Gottlieb Systems 80 CPU board. The fact that the Ni-Wumpf would work with the game, indicates the pinball machine itself was not the cause of the original CPU board not working.  The Illinois pinball repair company was blaming the slam-tilt circuit for the board not working.  We checked the slam-tilt wiring and it was not at fault.  In fact, someone had soldered the slam-tilt wires together so that it would never activate.  The symptom was that the game wouldn’t boot-up and would cycle the Tilt Relay about once per second. Searching the internet revealed that this is usually associated with a bad or corrupt ROM.

Obviously, neither board was fully tested before leaving the pinball repair company in Illinois.  Also, the ICs they replaced were sanded and painted.  In my opinion, no reputable repair service will do this.  I can’t even imagine why they do this.  The sanding can cause a huge build-up of static electricity, which will damage the chips.  I also noticed the sound board card edge connector was sanded.  We don’t know if the other repair company did this, but someone had sanded through the tin and nickel plating, which doesn’t oxidize very fast, down to the bare copper which oxidizes rapidly like a penny does.  Oxidation will cause the contacts to develop a high electrical resistance and cause lots of intermittent problems.  The best way to clean a circuit board edge connector is to use a pencil eraser and follow up with some denatured alcohol to remove any oil residues.

We didn’t do any further testing with the CPU board because the owner wants the other pinball repair company to make it right.

I brought the sound board back to my office.  I purchased an LM380N at JB Saunders in Boulder, and de-soldered the faulty chip and replaced it.  I connected a power supply to the board and with a signal generator, injected a signal into the input and verified the amplified signal was on the output.  The datasheet states the LM380 has a voltage gain of 50. 0.2V input was amplified to 10V on the output.

I shipped the board back to the owner.  Before reinstalling the sound board, I had him check to make sure there was no voltage on the speaker wire.  The presence of a voltage would indicated the speaker wire was shorted someplace and would probably damage the sound board.  He reinstalled the sound board and everything worked.

Police Force, Williams Pinball Machine

Location: Littleton, Colorado

Symptoms:  Weak flipper, lower playfield general illumination not working.

I started with the flipper.  I checked the mechanical aspects of the flipper by manually turning it. Then I checked the end-play by lifting it up and down, and tried to rock it back and forth to check whether the flipper bushing should be replaced.  Mechanically, everything seemed fine.

Next I turned to the electrical aspects of the flipper.  Flippers of this type have two coils wrapped around the solenoid coil bobbin.  One coil provides a strong magnetic field for starting the movement of plunger (slug) into the solenoid.  The other coil provides a weaker magnetic field for holding the plunger once it has been drawn inside the bobbin.  The force required to hold the plunger is less than what it takes to draw it in.

When the flipper button is pressed, both coils are initially energized.  Once the flipper is at it’s ending position, it opens a switch that turns off the more powerful coil and leaves the weaker coil energized.  This allows the flippers to be strong, but prevents them from burning up if someone were to hold the flipper button.  If power were applied constantly to the more powerful coil, it would overheat and start burning.

The switch that opens when the flipper reaches its end position is called the End of Stroke switch (EOS).  I check the EOS switch with the power off and the flipper in its normal resting position with my ohm-meter, and it was “open”, when it should have registered a short.  I cleaned the contacts with some 440 grit sandpaper, and adjusted the contacts to make sure they were closing when the flipper was at rest.

Drawing of flipper unit from the Police Force manual, showing the End of Stroke switch.

I rechecked the switch contacts with the ohm-meter and they were working properly.  We powered-up the machine to verify the flipper was working fine.  Basically, since the switch wasn’t closing, the flipper was only running with the weaker coil.

Next I took a look at why all of the General Illumination (GI) lights in the bottom half of the playfield were not working.  The GI lights are the ones that stay illuminated all of the time and light up the plastics and the playfield areas so that you can see the ball.

First I checked to make sure no voltage was present at one of the light sockets.  Although it was a remote chance, I wanted to be sure that it wasn’t just a case of the lights being burned out (which could have happened if there was a short with a higher voltage somewhere else in the machine).  There was no voltage (be sure to measure on AC scale).  I checked where the power was coming from the Backbox Interconnect board, and there was 6.3 volts there.  So somewhere between the backbox and the playfield, the voltage was getting lost.

I tipped the playfield all of the way up and found the GI Relay on a small circuit board at the very bottom edge.  The connectors that connect the wires to the board were burnt and falling apart.  The connector on the circuit board was burnt as well.

Connector failure is a common problem with GI lighting in pinball machines. Oxidation builds up on the connector pin, or the crimp, and causes the resistance of the connection to go up.  This causes the connector to heat up until it fails. Because each machine and manufacturer uses different types and sizes of connectors, it’s difficult to to keep connectors on hand.  In this case, I didn’t have replacements with me.

The owner didn’t want to wait to get the proper connectors and asked that I solder the wires directly to the circuit board.  I did so, and the lights all worked fine after that.  Normally I am a purist about having the connectors fixed properly, but in this case the connectors only served to make the board replacement easier, which is unlikely to ever need replacing.

GI lamp relay board.

We checked and replaced several burned out lights.  The game was working well and in good condition.


Aladdin’s Castle, Bally Pinball Machine, 1976

Location: Longmont, CO.

Symptom: Pinball machine wouldn’t reset.

I visually checked the most likely relays and contacts: Game Over, Coin, and Credit.  After not finding any problems with the relays, I checked the switches on the score motor unit.  I noticed that the motor was hot and was obviously energized, but not turning.  The cams rotated freely but the electric motor itself was seized.

I disassembled the motor and managed to get the seized shaft out of the bearing. I cleaned both shaft and the bearing, but there was still some type of corrosion on the shaft that was preventing it from turning freely.  I would have preferred burnishing the shaft with some very fine 0000 steel wool, but I didn’t have any on-hand.  I used some 800 grit sandpaper and removed the corrosion (or whatever it was).  I lubricated the bearing and the shaft so that it slid and rotated freely.

After reinstalling the motor into the scoring unit, the machine reset correctly when pressing the start button.

The scoring motor and switch bank assembly is basically the heart beat that runs an electromechanical game.  Without it, nothing will work.

We (the owner and I) noticed that the Ball In Play lights were not resetting back to Ball 1 during the reset.  I checked the stepper in the backbox and saw that it was sticky, which is a common problem.  It didn’t seem sticky enough that it warranted rebuilding. The Ball In Play stepper unit is a step-up and reset type. The owner cleaned the old lubrication from the contacts and I added a turn on the spring.  The stepper seemed to function fine after that.  I informed the owner that if problems continued with the ball counter, that it would have to be cleaned and re-built.

We replaced some burned out lights on the playfield and talked about playfield care.  I mentioned that a lot of collectors have differing opinions, but that I liked Novus 2 for playfield cleaning and polishing.

As for me, I’m going to start carrying 0000 steel wool in my repair kits for cleaning up motor and stepper shafts.  It has worked well with jukebox restorations I’ve done.

Bobby Orr Power Play, Bally Pinball Machine

Location: Littleton, Colorado.

Symptoms: Two of the displays had digits that were blank (off). General illumination lights on the backbox were not working.

I ran the display self-test to determine the full extent of the display failures.  One digit on the Player 1 score and one digit on the Player 4 score were not working. They were different digits, so it wasn’t a problem with connections from the CPU board.

I started with the Player 4 display.  I disconnected and removed the display from the backbox panel and checked the digit driver transistors with a mulitmeter on the “diode” scale.  The transistors checked OK.  This was a little surprising to me.  So I connected an oscilloscope to the digit drive signal.  It was OK where it was coming into the display board.  There was no signal on the collector of level shifter transistor (Q6 in the diagram).  Surprisingly, the 100K resistor was bad and read “open”.

Schematic showing one of the digit drivers.

I had previously read about the power rating of these 100K resistors being too small as originally designed, but I wasn’t expecting to see a failure with no visual indication of the resistor being over-heated.  I didn’t have any spare 100K resistors with me, but fortunately Radio Shack is still good for some very common parts.

I disconnected and removed the Player 1 display and immediately checked the resistor for the failed digit and it too was bad.  With the resistors from the nearby Radio Shack, I was able to desolder and replace the resistors on-site.  I re-assembled the displays into the backbox and re-tested.  Everything worked fine.

As for the general illumination lights not working on the backbox, this is a common problem and is often related to a connector.  This was no exception.  I traced the non-working branch of lights back to the connector at the power supply board.  A portion of the connector on the PCB had been previously replaced, with a version with slightly shorter pins.  The lights started working with just touching the connector.  I checked the solder connections on the back side of the PCB and cleaned the connector contacts.

As I usually do when I work on a pinball machine, I ran a light test and replaced several bulbs that were burned out on the playfield.


Chicago Coin, Fighting Irish and Big Hit pinball machines

Location: Longmont, Colorado.

Symptoms: Neither machine working correctly.  Many solenoids powered-up continuously and getting hot, relays buzzing, etc.

Both of these pinball machines are electro-mechanical (EM) from the early 1950’s; Fighting Irish (1950) and Big Hit (1952).  Given the age of these machines, both are in relatively good condition.  They have been in the owner’s family for decades, but haven’t been used for about 10 years.

I inspected the machines and both had sticky, gummed-up, stepper relays.  The Fighting Irish also had some sticky latching relays. The original lubrication on these parts had become gummy over the past 60 years.  This is a common problem with mechanical parts in older pinball machines and jukeboxes.  There is really no easy way to fix this other than to disassemble, clean, re-lube and re-assemble the parts.  Spraying something like WD-40 into the parts, if it works at all, is only a temporary fix.  Days later it will again be sticky once the WD-40 solvent evaporates.

I usually use denatured alcohol to clean the parts, then depending on the situation, use SAE 20 electrical motor oil for lubrication of shafts and Teflon grease for gears and slides.  (Avoid using white lithium grease, as it separates and dries out quickly.)  This only applies to older jukeboxes and pinball machines.  Solid-state pinball machines require practically no lubrication.

I rebuilt the stepper relays and showed the owner how to do it also.  Between the two of us, we got all of the mechanical parts working freely. We had to adjust the solenoid position on one stepper used in Big Hit because there wasn’t enough travel for the “catch lever” to reliably engage the tooth of the main stepper wheel.

The flippers on Big Hit were also gummed up.  They were removed, cleaned and re-assembled.

We powered-up Big Hit and all electrical items seemed to be working fine.  We powered-up Fighting Irish and it still had some electrical problems that needed to be addressed.

I found that the main connection to the secondary of the transformer had broken off.  I re-soldered it.  That got most things working.  Then after scoring about 70,000 points, the machine’s score motor would start continuously running, racking up points and never stopping.

There aren’t any existing schematics available for either of these machines.  So I just watched various relays and determined which ones were used when the machine got stuck scoring.  I held some relay contacts with my fingers and determined that one was repeatedly engaged when the scoring problem started.  With a tone and probe, I was able to trace the power for that relay to another relay’s contacts, and then back to another relay, and then back to the original relay where I discovered a broken wire to one of the contacts.  I re-soldered the wire and all worked fine after that.  When using a tone and probe, the machine must be powered off (unless you’ve got one that can withstand the AC voltage spikes present in an EM game).

A tone and probe seems to be a good tool for tracing wires in a pinball machine, especially when one doesn’t have a schematic.  It was invaluable on this pinball machine repair.  I’m still learning how to use it effectively on EM pinball machines. Since I don’t have an EM machine of my own, I will have to wait until the next repair call to learn more.

The owner of these machines has a number of minor repair items to take care of, but the bulk of the electro-mechanical problems are fixed.


Dirty Harry Pinball Machine, Bally/Williams

Location: Denver, Colorado.

Symptoms: Dot matrix display (DMD) flickering and displaying random garbage.  Test Report listed Sound Error.

This machine looked to be in very good and clean condition.

I opened up the backbox to investigate the display problem. There is a wide gray ribbon cable that connects the CPU board to the Dot Matrix Controller Board.  All I had to do was touch the connector where it connects to the display board and the problem went away and never came back. The connector didn’t appear loose.  I disconnected connector from the board, squeezed it from front to back to make sure the connector was making a good connection with the ribbon cable.

This type of connector is referred to as an Insulation Displacement Connector (IDC).  There are small gold plated forks that pierce the insulation in the ribbon cable and make connections with the internal conductors.  Sometimes a little oxidation forms between the the fork and the conductor and squeezing will help restore the connection.  If it’s really bad, the connector can usually be carefully removed and re-crimped on the cable next to the original location.  (To do this correctly, you will need a padded vise to gently squeeze the connector onto the cable without breaking the connector.)

Once the display was working, re-powering the machine indicated there was a Test Report.  This will only display if the the computer has detected a problem.  Viewing the test report indicated a Sound Error.  I went to the test menu and performed a Sound Test.  All of the sounds were working fine.  I powered down the machine and reseated all of the sound EPROMS on the sound board.  Upon powering the machine back up, the Test Report didn’t show up, indicating the problem was no longer present.

The customer asked about routine maintenance and what should be done.  The most important routine maintenance is keeping the machine’s playfield clean.  Every time the pinball hits a pop bumper, slingshot or even the flipper, the friction of the ball accelerating or decelerating on the playfield will cause a microscopic amount of metal dust to come off the ball. After a while, the grayish metal dust accumulates and starts to wear into the playfield. It migrates down into the switch contacts and mechanical parts, wreaking havoc. It leads to all kinds of intermittent and permanent failures.

Likewise, since the microscopic metal dust is coming off the ball, the balls should be periodically replaced. The ball surface develops microscopic pits, which makes the ball rougher, which increases the friction mentioned above, which increases the wear on the playfield, etc.

One quick look at this Dirty Harry pinball machine told me the owner had been keeping it clean.


Judge Dredd follow up

Location: Denver, Colorado.

A few months later, I was called back to the Judge Dredd machine mentioned in this previous post.

The thermistor in the power line module had burned out.  I replaced it and tested the machine.  I noticed that the shorted switch-row problem had returned.  The nice thing was, it was a solid failure this time and I was able to track it down.

In my previous post, I mentioned the short would go away if I unplugged J212.  This was the case again, and it deceived me into thinking the short was somewhere along this stretch of wires that heads towards the coin door.   In the switch table in the service manual, Switch 24 is listed as Always Closed.

(The switches and lamps in a pinball machine of this vintage are multiplexed in a grid.  This reduces the complexity of circuitry and wiring.  Rather than having 64 separate wires to 64 switches, by multiplexing, 64 switches can be monitored with just 16 wires.)

Somewhere in the machine, there is a diode connecting Column 2 and Row 4.  It turns out it’s on Coin Door Interface Board, which is were the wires from J212 end up (D2).

What is deceiving is that when a column is shorted to ground, any switch that is closed will show that row to be shorted.  Since switch 24 bridges column 2 and row 4, every switch in row 4 was shown as closed, leading me to believe the problem was in row 4.  But when I closed other switches in column 2, the entire corresponding row would show as closed.  And as a verification, I open the diode at D2 and the remaining switches in row 4 began functioning normally.

Once I determined the problem was actually in column 2, and the symptom indicated it was shorted to ground, I unplugged J205 and J212 to isolate the CPU board from the rest of the machine.  I measured the outputs of each column driver and found the output of U20, pin 17 was stuck at ground.

I replaced the ULN2803 with a new part and everything in the pinball machine tested normal.