Theater of Magic (Bally/Williams 1995)

Symptom: Game not playing correctly, one string of lights out, eddy current sensors needed adjustment.
Location: Denver, CO

I fixed some of the easier stuff first, such as adjusting the eddy current sensors and fixing the string of lights that was not working. As for the lights, the driver transistor was good, but found a bad solder joint on U19 (ULN2803) on the Power/Driver board.

The game didn’t play correctly. Most often when completing an illusion, the countdown timer would stop and the game would never finish the illusion.  It was falsely saying the Secret Ball Lock was locking a ball.  Mulitball would falsely start, but since there were no balls actually locked, it couldn’t really have a mulitball.  After two balls were locked, the magic trunk is supposed to spin around and show the target (magnet) face, but instead would spin to the side with the light on it.

Yet everything in the diagnostic tests worked just fine.

My experience with other Bally/Williams machines has shown that when a game is not playing correctly, there is something wrong with one of the switches either not registering when it should, or registering when it shouldn’t.  (It’s the old computer adage “Garbage In, Garbage Out”.) The question is which one (especially when all of the switches work fine in diagnostic mode)?

After taking a close look at the rulesheet, I was able to narrow down all of the symptoms to just one optical switch that was triggering when it shouldn’t have: The magic trunk rear entrance (a.k.a. subway switch #36). One of the key points in the rulesheet is that anytime the machine senses the ball going under the playfield, the countdown timer will stop until the ball resurfaces.  The other key point was that if the ball enters the rear of the trunk when the Lock light is not lit, then you get the Secret Ball Lock. The ball had never gone into the rear entrance when testing.

Switch #36 is an optical switch (opto) that triggers when the ball breaks a beam of infrared (IR) light between the transmitter and the receiver. I measured the voltage across the photo transistor (receiver) and measured about 5 volts.  The voltage should be either below 1 volt (opto unblocked) or around 12 volts (opto blocked).  This told me that not enough infrared light was reaching the receiver (btw you can’t see this IR light with your naked eye).  I cleaned both the transmitter (LED) and the receiver to see if that improved anything, and it didn’t.

With optical switches, the IR LED is usually the component that fails.  I tested the LED with an IR detector and it showed it was emitting light. I went ahead and replaced the LED anyway.

Bad infrared LED used in rear trunk entrance (subway).

Bad infrared LED used in optical switch located at the rear trunk entrance (subway).

I installed the transmitter board back into the machine and measured the voltage across the receiver.  This time it measured 0.2 volts, which is a huge improvement, down from the 5 volts measured before the replacement.  I knew at that moment the game was fixed.

Even though the old IR LED was emitting light, it was not enough light. And the receiver was sitting at a voltage that was right on the threshold.  So all it took was some minor voltage fluctuations during game play (fluctuations that were not present during the diagnostics) to falsely trigger the switch circuit.

“Welcome, to the Theater of Magic!”


Indiana Jones: The Pinball Adventure (Williams, 1993)

Symptoms: Machine wouldn’t boot and had switch matrix problems once it did boot.
Location: Denver, CO

The pinball machine didn’t boot due to some oxidation on the ROM pins.  I removed the game ROM from the MPU and cleaned with contact cleaner.

Once the game booted, there were solenoids firing in attract mode which usually indicates that there are some switch matrix problems.  The diagnostics revealed that many of the opto switches were not working.

On many Williams machines of this era, there is a board mounted under the playfield that provides an interface between the optical switches and the switch matrix.  In the case of Indiana Jones, it’s labeled “10 Sw PCB”, which will interface up to 10 optical switches.

I began to take some voltage measurements on this board and nothing was correct.  Upon closer examination, something acidic had dripped on the board and, just like battery alkaline, had eaten through the circuit board traces.  At first I couldn’t find the source of this acid, but eventually figured out it was from the electrolytic capacitor (C1) that was also located on the board.

Cap[tion

Capacitor C1 had leaked, damaging the area around D13 and U3.

I cleaned up the board and replaced C1 and U3. I had to re-wire some of the circuit traces since some no longer had continuity.  I reconnected the board and switch matrix worked fine.

In testing the machine, I found a blown fuse associated with the flash bulbs.  I replaced the fuse and checked the flasher sockets and found a frayed wire that probably had caused the fuse to blow.

This same customer also had a The Machine: Bride of PinBot (Williams, 1991) that he wanted me to take a look at.

The first thing I noticed was that the lights weren’t sequencing properly around the “helmet”, plus some of the bulbs appeared to be out.  After tracing signals to the Chase Light interface board, I found some wiring errors that were probably made at the factory.  And the problems with non-working bulbs was related to connection issues. Once repaired, the lights sequenced properly around the helmet.

When playing the game I noticed the slingshots were making the sound like they were firing, but they weren’t actually kicking the ball.  A peak under the playfield revealed that both plunger/link assemblies were broken.

Broken links associated with slingshots.

Broken links associated with slingshots.

I replaced both of those plunger/link assemblies and the machine played well.

I’d like to note that I stock a lot of parts so that I don’t have to make multiple trips to a customer’s location.  While I can’t stock an entire warehouse, I had all of the parts on-hand to repair both of these machines, including the circuit board, in a single visit.


Reset issues on pinball machines

Often people will contact me about reset issues with Williams pinball machines, primarily associated with the WPC era from the early 1990’s. I presume they do a little searching around the internet and come to the conclusion this is a real common problem, solved by replacing BR2 (bridge rectifier) and C5 (filter capacitor).

What happens is that many people will attempt to shotgun these parts (shotgun means to replace without knowing if they are in fact defective).  Some of these people will have limited de-soldering experience, and end up damaging their Power/Driver board.

In my professional experience (30+ years), my opinion is that there is no common Williams reset problem.  Reset issues can occur in all solid state pinball machines (even on some EMs) and all brands, and it can be caused by many different things, most of them related to the power chain. When the voltage drops below a threshold, the circuitry is designed to reset the pinball machine.

I’m all for people repairing their own machines, and I’m happy to help and teach them.  But shotgunning parts on a printed circuit board is usually not good for the board.  The heat and physical stress from de-soldering a part will usually lift the copper pads or traces from the fiberglass, or pull out the metal plating that is inside the hole that the component pin is going through.

If you have a reset problem, get the correct diagnosis before swapping out parts.

With my oscilloscope, I can check BR2/C5 in about 60 seconds.  It’s immediately apparent when the bridge rectifier is defective; the pulsating DC will only have every other pulse showing.

Here are some reset issues I’ve worked on, and what the problem ended up being:

  • Independence Day (Sega):  This is one of the very few that ended up being the bridge rectifier.  In the case of Sega, it’s called BRDG21.


  • White Water (Williams): The owner was having a reset issue and had read about BR2 being the culprit.  He wanted me to verify that BR2 was defective. It turned out that it had already been replaced, along with C5. While I was at his home, the basement lights dimmed when the furnace blower switched on.  I suspected an issue with the house wiring (it was an old house).  He turned on other appliances and the line voltage reading dipped down to about 105 volts.  I suggested he try a uninterruptable power supply (UPS), normally used for computers, to handle these brownouts.


  • Black Knight (Williams): The basement of this home was wired with ground fault interrupters (GFI) after a flood.  Most pinball machines won’t work with a GFI.


  • Star Trek: The Next Generation (Williams): Reset issues on this machine were only in the first few minutes of power being turned on.  I replaced the inrush current limiter (varistor in the power switch box).


  • Starship Troopers (Sega): Resets were pretty random, but grouped together.  I traced the problem back to the F23 fuse.  It was loose in the fuse clips and running very hot.  I tightened the fuse clips and reinstalled the fuse.


  • Twilight Zone (Bally/Williams): The reset problem was caused by bad solder connections on the 5 volt regulator. The 5 volt regulators run very hot on Twilight Zone machines and the solder tends to get fatigued due the high temperatures. The old solder was removed from the pins and new solder was applied. The ground on the 5 volt regulator is connected to the circuit board with some screws. These screws were showing signs of rust and were replaced as well.


  • Twilight Zone (Bally/Williams): The reset problem was caused by the power connector, where the 5 VDC leaves the Power/Driver board at J114.  The insulation displacement connectors (IDC) have metal forks which pierce the insulation of the wire to make a connection with the copper inside.  These connectors are problematic due to the wire working loose due to vibration and movement.  I re-seated the wires into the connector and the problem was solved.


  • Doctor Who (Bally/Midway): same problem as Twilight Zone above, except at connector J101, where the low voltage AC power enters the power driver board before going to BR2.


This is just a sampling, but failures of BR2 are not as common as some people think. Also, I have yet to see a case where C5 was weak or needed to be replaced.

Spy Hunter Pinball Machine (Bally, 1984)

Symptoms:  Not all sounds are being played.
Location: Broomfield, CO

The owner had already replaced the troublesome capacitors, but the Cheap Squeak sound board was not producing all of the sounds.  I bench tested the sound board and everything seemed to be fine.

It turns out there is a setting that enables the full set of sounds.  What makes it worse is that if the MPU board battery goes dead, the default sound setting is “chime only”.  To re-enable the full sound setting, follow these steps:

  1. Open the coin door and press the small test pushbutton switch near the top center of the door.  This will begin the various steps of the self test.  The first test is the display test and all of the displays will start counting up.
  2. Continue pressing and releasing the test switch, no faster than once per second, until you see the Ball Count display (right side middle of the back box) incrementing 1, 2, 3, with every press of the switch.  You will have to step through the other self-tests before the value will start incrementing.
  3. Continue pressing and releasing the test switch until it has counted up and the display is showing “18”. The other score displays will probably be displaying “00”.
  4. Press the replay/start button on the front of the coin door until the other displays are showing “03”.  They will increment starting at 00 with each press of the start button.
  5. Turn the power off, and wait about 5 seconds and power the machine back up.  Play a game and the sounds should all be working.  When a game is started, the background music will start.

On this particular pinball machine, pressing the replay/start button in Step 4 did not advance the value shown in the score displays.  This was because the switch was grounding out against the metal support behind the switch. There is normally a thin, stiff, piece of cardboard (called “fish paper”) to insulate the switch, but it was missing.  The metal support was taped to insulate it, and the switch began to work properly.


Electromechanical Pinball Machines

I’ve been working on a lot of EM (electromechanical) pinball machines lately. I usually don’t write about them here because the repairs don’t make for interesting reading and wouldn’t be very helpful to owners of other pinball machines.

Electromechanical pinball machines are the ones with the score reels instead of digital readouts, and have chimes and bells instead of electronic sounds. These machines use mechanical motors and stepper relays instead of digital circuits. It’s pretty amazing what they were able to accomplish using mechanical devices before the digital age.

As pinball machines become more popular, many of these old machines are being pulled out of storage and need a little TLC to get them up and running again.

Some of the EM pinball machines I’ve worked on recently are:

Dealer’s Choice (Williams, 1974)
Straight Flush (Williams, 1970)
Aladdin’s Castle (Bally, 1975)
Bally Hoo (Bally, 1969)
Super Star (Williams, 1972)

There are two common problems that most EM machines have: Dirty or mis-adjusted contacts or gummed up stepper units or score reel mechanisms.

There are hundreds switch contact points in an EM machine. Usually about one percent of the contacts are dirty or out of adjustment. What happens is the contact will get some dust on it. When the contact opens or closes, it sparks, which turns the dust into carbon. Carbon acts as a resistance, reducing the amount of power flowing through the contact. If the carbon build-up is substantial enough, no current will flow through the connection when the contact closes. Sometimes the current will flow through the contact generating heat, which is my theory on why they get out of adjustment.

The second most common problem is gummed up stepper units or score mechanisms. Usually the manufacturer put a thin layer of grease on the disk contacts. Over time this grease gets dirty and also turns into a sticky gel. The solution for this is to clean/rebuild the steppers.

I often get asked about the value of an EM pinball machine. Looking at the Mr. Pinball 2014 price guide, most EM pinball machines I’ve encountered are worth about $500, give or take, in very good condition. The items that affect the value the most are cosmetic, such as the playfield paint and wear, the backglass paint (which often peels), and the cabinet paint. These are the same things that affect the value of a solid state game, except supply and demand plays a bigger role.

Most of the time, electromechanical pinball machines are worth fixing, especially if the cosmetics are good.

Indiana Jones: The Pinball Adventure (Williams, 1993)

Symptoms: Left flipper not working.
Location: Denver, Colorado.

In Williams pinball machines of this vintage, the flippers are driven by the solid-state Fliptronics II board, which is located in the backbox in the upper left. There are 4 fuses, one for each possible flipper in the game: upper right, upper left, lower right, lower left (F901 – F904 respectively, each of which are 3 amp, slow-blow). In the case of many Williams machines, there are less than 4 flippers. If your game only has two flippers, you have 2 spare fuses available if you’re in a pinch.

In the case of Indiana Jones, there are only 2 flippers. When I was first contacted by the customer, I told him to check F904 which is labeled for the lower left flipper.  He went ahead and replaced it, but it didn’t solve the problem. So, I paid the machine a visit.

I determined that the flippers in this machine are wired to the upper flipper outputs, therefore F902 was the culprit. I vaguely recall running into this somewhere else.  Maybe that’s why it’s called The Pinball Adventure.

So, if you have a Fliptronics machine and you have a non-working flipper, check both upper and lower fuses.  By the way, the fuses are arranged on the circuit board in the same way the flippers are arranged on the playfield: upper left fuse is the upper left flipper, etc.

Zaccaria Pinball Machines

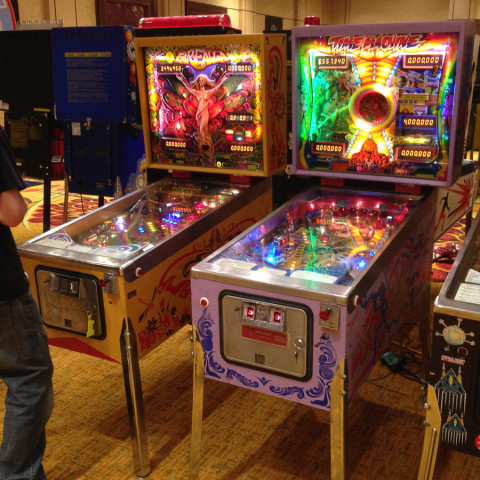
I’m currently doing some repair work on a couple of Zaccaria pinball machines for Lyons Classic Pinball. Zaccaria was an Italian pinball manufacturer and it’s interesting to see a few features that you don’t usually see on U.S. made pinball machines.  The pinball machines are Time Machine and Farfalla (which translates to Butterfly in English), both of which were manufactured in 1983.

Backglass for Time Machine

Backglass for Time Machine

Both machines use a neon tube for a light source around the perimeter behind the backglass. The backboards are made from a vacuum formed plastic which makes them three-dimensional.

Backglass for Farfalla

Backglass for Farfalla

Both machines have an elevated shooter lane that allows for a wider playing field that takes up the full width of the cabinet.  Where ever there is a location where the ball needs to come down to the main playfield, a wire ramp lowers by the weight of the ball, allowing the ball to roll down rather than being dropped.  This saves wear and tear on the playfield.

At top of photo, a wire ramp that lowers the ball to the playfield without dropping it.

At top of photo, a wire ramp that lowers the ball to the playfield without dropping it.

On some dual flipper games like Captain Fantastic, the ball can be lost between the flippers.  On Time Machine the outer flippers have some extra plastic on them allowing the player to trap the ball on the inner flipper without it draining.

The dual flippers on Time Machine are designed to not let the ball drain between them. On the far right is the flipper at rest.

The dual flippers on Time Machine are designed to not let the ball drain between them. On the far right is the flipper at rest.

At the time, Zaccaria was into making pinball machines with transparent upper playfields.

Upper playfield of Farfalla. Note again the wire ramp that lowers the ball to the main playfield without dropping it.

Upper playfield of Farfalla. Note again the wire ramp between the flippers that lowers the ball to the main playfield without dropping it.

Time machine has a transparent playfield that raises and lowers.

Center playfield on Time Machine in the raised position.

Center playfield on Time Machine in the raised (“Future”) position.

Center playfield on Time Machine in the lowered position, allowing access to the targets at the top.

Center playfield on Time Machine in the lowered (“Past”) position, allowing access to the targets at the top.

On most U.S. pinball machines, the ball count starts at 1 and goes up from there.  On these Zaccaria pinball machines, the ball count display starts at 3 and counts down, giving you the number of balls remaining.

Many Zaccaria pinball machines have a feature called “Game Time Bonus”.  On the final (3rd) ball, the game time bonus counts up.  It increments every time a target is it.  The better the player plays the final ball, the longer time they have for the bonus ball.

Game Time Bonus in bonus ball count down mode.

Game Time Bonus in bonus ball count down mode.

The bonus ball is the 4th ball played (assuming you weren’t awarded any extra balls).  As soon as the ball is shot, the counter starts counting down.  The idea is to better your score with time remaining.  When the time runs out, the flippers go dead and no more scoring occurs. One cool thing with Time Machine is that if you get the game to go “into the past”, the countdown stops and you can play the bonus ball as long as you stay in the past. As soon as you return to the future, the countdown continues. If the ball drains before time has run out, you get another ball. So in effect you have unlimited balls as long as time remains.

Farfalla has flippers beside the outlanes which under certain circumstances allows the player to save the ball.

Farfalla has outlane flippers allowing the ball to be saved.

Farfalla has outlane flippers allowing the ball to be saved. The flipper ‘flips’ up to the left.

The outlane flipper is armed by a playfield switch located directly above the flipper in the outlane.  Once armed, the flipper can only be used once. You have only a fraction of a second between the time the flipper is armed and pressing the flipper button. The odds are against you, but the ball can be saved.

How many pinball machines have a Love theme?  (From Farfalla).

How many pinball machines have a Love theme? (From Farfalla).  In spite of the theme, the game is fun to play.

Another interesting thing, these machines have a headphone jack mounted next to the coin door.  I know of several tech companies which have pinballs for their employees to use when taking a break. A headphone jack would be handy. Instead they turn the volume down to where you can barely hear it.

Both machines have very colorful artwork and we might convert them over to LED lighting.

At present, LCP hopes to bring both of these machines to the Rocky Mountain Pinball Showdown in June.


Rockola 1488 Jukebox (1960)

Location: Henderson, Colorado
Symptom: Turntable speed too slow

One of the most common problems of Rockola jukeboxes from the mid-1950’s through the 1980’s, is the turntable not turning at the correct speed. This is almost always associated with the old rubber grommets that hold the turntable motor.

Height comparison of new turntable motor grommet with old grommet.

Height comparison of new turntable motor grommet with old grommet.

The turntable motor basically hangs from three of these grommets.  As the grommets age, they get dry and brittle and shrink and the motor gradually sinks.  I assume the weight of the motor is not evenly distributed among the three grommets because it seems like 2 out of the 3 are in worse shape. This causes the motor to tilt and the shaft is no longer aligned properly.

This photo only shows two of the grommets, but you can see that rear grommet is more compressed.  The motor has already been removed.

This photo only shows two of the grommets, but you can see that rear grommet is more compressed. The motor has already been removed.

What’s worse is that many of these jukeboxes are designed to play 33 RPM records. The motor shaft has two milled diameters, the bottom one is for 45 RPM and the top one is for 33 RPM records. As the motor sinks, the idler wheel begins to ride on the 33 RPM portion of the shaft.

Generally these grommets are easy to replace. The motor will be mounted in a variety of ways depending on the jukebox, most using screws or shafts with spring “E” clips. One source for new grommets is here.

High Speed, Pinball Machine (Williams, 1986)

Symptoms: Some game-play functions not working, display issues, flasher bulbs not working.
Location: Frisco, Colorado.

When entering the test menu, the machine displayed a number of switch error codes. These switch error codes were causing the game to play incorrectly, for example, not diverting the ball to the “hide-outs”.  Although the error codes indicated 4 switches, only one was not working.  Ramp switch #42 wasn’t working, which prevented the ramp ball diverter from actuating, which caused the machine to think the other switches were also bad because the ball never rolled over them.  I cleaned switch #42 (very stubborn) and got it working.

Some segments of the alpha-numeric displays were not lighting up.  I traced this to cracked pins on the display tubes themselves.  I was able to repair some pins by soldering, but there was one pin broken right at the glass and couldn’t be soldered.  The owner deferred further repairs to the display. The options would be to replace the glass display tube or convert the game to new LED displays, such as PinScore.

When testing the bulbs, I noticed that none of the flasher bulbs were working. In this particular version of High Speed, the flashers are connected in series with a non-standard 7 volt bulb, #63.  Most pinball machines use 13 volt #89 bulbs for flashers.

The problem with bulbs connected in series is that when one bulb burns out, the other bulbs in the string stop working as well. This makes it difficult to determine which bulb is actually bad.  In High Speed, the bulbs are connected in pairs.  To make matters more unintuitive, the pairs are interleaved.  So for example, the 4 bulbs for the left center playfield are paired 1, 3, and 2, 4.

I had to take each bulb and test it with an ohm meter to determine the bad bulbs.  Once I got good bulbs paired with good bulbs, the flashers started working.  Since the whole theme of the game is associated with being chased by the police with flashing lights, I can’t imagine it was much fun to play without the flashers.