Seeburg SHFA4 Jukebox Amplifier

Location: Lakewood, CO
Symptom: Loud hum on speaker outputs, amplifier rebuild.

As usual with an amplifier of this vintage, all of the electrolytic capacitors were replaced. This fixed the problem with the loud hum.  Also one of the electrolytic capacitors was causing a bias problem with one of the preamp transistors, causing that channel to be weak.

After the capacitor replacement, I was testing the amp with the oscilloscope, there was still one channel substantially weaker than the other, and both channels had non-linearity distortion. I traced this to the AVC (Automatic Volume Control) circuit.  The AVC circuit is used to level the volume between different records and different sides.

The AVC circuit uses the resistance through diodes to achieve this. The resistance of the diodes changes with the amount of current flowing through it.  The louder the song, the more current flows through the diodes, the lower the resistance, which lowers the volume.

AVC block diagram (click for larger).

AVC block diagram (click for larger).

The problem with this vintage of amplifiers is they used selenium diodes.  These diodes seem to fail with age.  In this case, diodes in both CR103 and CR104 were bad.  One was nearly open, another nearly shorted.  The resistance across the other diodes was high.  My multimeter couldn’t properly read them, so I relied on just measuring voltages across them.

Small selenium diodes are no longer made.Silicon diodes can be used, however, you have to use more than two in series for each selenium diode you replace.  I started with using two 1N914 diodes for each diode in CR103 and CR104.  The resistance was too low and my signal going into V101 was too weak.  So I doubled them, using four 1N914 diodes for each diode in CR103 and CR104.  That was 16 diodes total.

Old selenium diode pairs.

Old selenium diode pairs.

Rework showing the strings of four 1N914 diodes in the AVC circuit.  One string is exposed, the others are in the green shrink tubing.

Rework showing the strings of four 1N914 diodes in the AVC circuit. One string is exposed, the others are in the green shrink tubing.

I also replaced the CR102 diode pair.  For this, a single 1N914 can be used for each diode in CR102. After taking some measurements, I could have used three diodes for each, instead of four.  But with four, I get a little more input into the V101 tube (about 120mV) without causing clipping on the output.

The amp is now working great!

So if you’re rebuilding an amp with selenium diodes in the AVC circuit, replace them with 3 or 4 1N914 diodes in series for each diode in CR103 and CR104 and use single diodes for CR102.  It ends up being a lot of diodes, but they are small and cheap.


Disco Fever Pinball Machine, Williams (1978)

Location: Windsor, Colorado
Symptoms:  Wouldn’t boot.

The owner didn’t realize there were batteries in the backbox.  And of course they were leaking.  I removed the battery holder from the board and fortunately the board hadn’t been damaged by the alkaline. I replaced the RAM chip with an AnyPin NVRAM module so that forgotten batteries wouldn’t be an issue again.

The machine booted up fine after that.  I did a quick “shop” job on the machine, replacing rubber rings, burned out lamps, and cleaning the playfield.  There is a broken pop bumper cap, but I am unable to find an exact replacement.

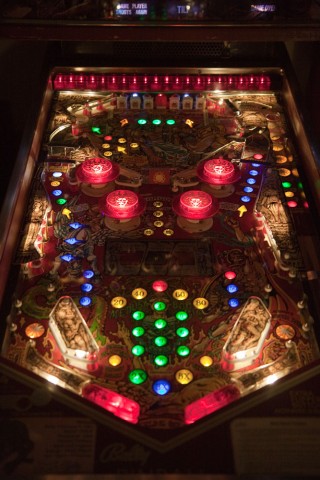
Pop bumpers, with target in the center and arrows/triangles around edge.

Pop bumper caps, with target in the center and arrows/triangles around edge.


Spy Hunter Pinball Machine, Bally (1984)

Location: Lone Tree, Colorado

The owner had done some previous work on the sound board because it was blowing fuses.

When replacing capacitors, diodes, and ROMs, always double check the polarity.

When replacing capacitors, diodes, and ROMs, always double check the polarity.

Backwards ROMs.  The notch in end edge of the ROM chip should align with the notch in the socket and silkscreen image on the board.

Backwards ROMs. The notch in end edge of the ROM chip should align with the notch in the socket and silkscreen image on the board.

I determined that the 6803 controller was bad, as well as one of the ROMs.

Seeburg Jukebox Amplifiers, MRA4 and SHFA1

Location: Loveland, CO
Symptoms: SHFA1: one channel not working well; MRA4: generally not sounding good.

Both amplifiers were brought back to my office for bench testing and repair.  It’s really the only way to work on an amplifier.  A known signal, usually a sine wave is injecting into the input.  A dummy 8-16 ohm load is connected to the speaker outputs.  With the oscilloscope, I start at the speaker outputs and observe the signal.  If it looks distorted or weak, I work my way back to the inputs to find the fault.

The SHFA1 had one channel that wasn’t working well.  I found that the output of the first stage 12AX7 wasn’t outputting as well as the other channel at the same point.  The grid of the weak channel had a more positive bias on it of a couple of volts.  I traced it to a leaky 0.22uF capacitor.

Once that was repaired, now the weak channel was much stronger that the other.  I traced that to a bad 12AX7 just before the final output stage.

This amp had some previous work done on it, some capacitors had been replaced throughout, but interestingly, some of the most common ones that would normally be replaced hadn’t been touched, like most of the electrolytics.

The MRA4 hadn’t ever been service.  It still had the original paper and wax capacitors used prior to the 1960’s.

When rebuilding an amplifier, I usually replace every electrolytic capacitor.  If the amplifier is from 1960 or earlier, I usually replace every paper/wax coupling cap that has high voltage across it. I will usually leave tone control and other low signal voltage caps.

Prior to the cap swap, the MRA4 had a weaker output than I normally see.  I traced this to a leaking 0.05uF capacitor in the coupling circuit to the final 6L6 tube.  This caused the tube to be biased so that it wasn’t operating in a push-pull configuration.

This amp still had the original 6L6 tubes installed.  For fun, since I had some brand new 6L6 tubes, I installed those and they didn’t deliver the output that the original tubes did. I put the original tubes back in.  I rarely replace tubes unless there is a good reason to.  And this little experiment proves why.

Both amps are working great!

Medusa Pinball Machine (Bally, 1981), LED upgrade

Most pinball LED’s that I’ve come across are not compatible with the early Bally solid state pinball machines from 1979 to 1985.  These machines use a lamp driver board, where each controlled lamp is driven by a silicon control rectifier (SCR), which is also known as a thyristor. Bally’s Medusa falls into this category.

An LED installed into a Bally of this vintage will flicker or not work at all.  The problem can be overcome with a 1000 ohm (1K) resistor in parallel with the LED.  The reason for the flicker is somewhat technical and is explained below.

Some people opt to solder a resistor across every lamp socket.  This isn’t too much of a problem if the number of lights is not high.  Medusa has over 80 controlled lights and that would be a lot of work, especially on the hard to get at sockets.

Since one side of each lamp is common to all of the others, a pull-up type resistor network can be used.  Also, since the connector pin spacing on the lamp driver board is 0.100″, this is a perfect match for using though-hole resistor networks because the pin spacing is the same.

Rear of Lamp Driver board showing resistor networks (pullups) installed.

Rear of Lamp Driver board showing resistor networks (pullups) installed.  Click for larger.

The resistor networks were laid horizontally next to the lamp output pins on the reverse side of the board (the view from the front of the board is unchanged and you’d never know the resistor networks are there).  The common pin from each network was bent up vertically where a wire connected all of them together (blue wire in the above photo).  The blue wire was routed through a single pin connector to the lamp common on the backboard. The single pin connector allows the driver board to be removed from the backbox.

Another nice thing about doing it this way, as opposed to putting a resistor on every socket, is if the machine is ever sold and the new owner (a purist) wants to switch back to regular #47 incandescent lamps, the resistor networks can easily be removed from the back of the circuit board (though incandescent lamps will work perfectly if the resistor networks remain in place).

On Medusa, there is a light bar at the top of the playfield.  It was decided to leave those as incandescent lamps. A LED can turn off and on faster than an incandescent bulb, and I think with today’s bright LED’s and the fact they are aimed right at the player, the flashing would be a bit too much.  Aside from that, all controlled lamps and general illumination on the playfield and backbox were replaced with LED’s.

Playfield with all LED lighting (except for row of red lights at the very top).  Click for larger.

Playfield with all LED lighting (except for row of red lights at the very top). Warm white LEDs were used for under playfield plastics. New translucent polyurethane flipper rubbers were used on the illuminated flippers. Click for larger.

Backgox LED lighting, with a mixture of warm white, cool white, and red LEDs for the eyes.

Backgox LED lighting, with a mixture of warm white, cool white, and red LEDs for the eyes.

Side LED's from Cointaker.com were used in places like the Gorgon rollover switches.

Side LED’s from Cointaker.com were used in places like the Gorgon rollover switches.


I’m not totally sold on the idea of upgrading older machines with LEDs, but all in all, I think it’s an improvement for Medusa.

Continue reading

Wurlitzer 2204 Jukebox, 532 Amp Rebuild

Location: Denver, Colorado.
Symptoms: Amp rebuild.

When I listened to the amp, I didn’t really hear anything in particular that was wrong with it.  But the owner was unhappy with it.  Someone had previously done some work on it, replacing a few capacitors, including the main filter capacitor on the output of the 5U4 rectifier tube.

I brought the amp back and bench tested it.  It failed.

Amplifier working normally at 50% volume.

Amplifier working normally at 50% volume.


Amplifier breaking down and oscillating at slightly higher volume.

Amplifier breaking down and oscillating at slightly higher volume.


Amplifier in bad shape at full volume.

Amplifier in bad shape at full volume.

The problem was primarily in the power supply as these waveforms were measured at the Aux Amp output, which is essentially the output of the preamp stage.  The final output stage was loading the power supply and breaking into oscillation.  Most often when an amplifier breaks into oscillation, there is a faulty capacitor someplace.

I decided to do my standard “re-cap” where I replace all of the electrolytic capacitors and some of the rolled capacitors of smaller values subjected to high voltages.  I tested some of the old capacitors once they were out of the circuit (except in rare cases, capacitors can’t be tested while they are in the circuit). There are two large can capacitors that contain four capacitors each.  All of the capacitors in one of the cans were dead (reading very low).  All of the capacitors in the other can were better, but all were out of tolerance. Those cans probably were the culprits of the oscillation.

Unmatched 6L6 tubes, not even from the same era. The one on the left is military surplus.  The one on the right might be original.

Unmatched 6L6 tubes, not even from the same era. The one on the left is military surplus. The one on the right might be original.

Both Wurlitzer and Seeburg amplifiers of this era use 6L6 tubes in the final stage of the amplifier. From a theoretical point, the two tubes should be gain-matched because one tube drives the upper half of the waveform, the other tube drives the lower half of the waveform (a.k.a. push-pull amplification).  But these amplifiers seem to be pretty forgiving if the tubes are not matched. I once saw a Seeburg operating with one 6L6 tube missing.

The owner and I decided to go ahead and get new output tubes.  The nice thing about 6L6 tubes is that they are still being made today due to their popularity for use in guitar amps.

After all the work was finished on the amp, it tests perfectly at all volume levels.


Hurricane Pinball Machine (Williams, 1991)

Location: Littleton, CO
Symptoms: Sound problems, ferris wheel getting stuck, backboard spinner not working, backboard and playfield G.I. lights not working.

One of the ferris wheels was binding causing the belt to slip. I loosened the belt from below and spun both wheels.  One turned freely, the other did not.  I removed the e-clip, a washer and cleaned the shaft of sticky lubrication. The problem seemed to be the washer, which was too thick and causing to much friction when the e-clip was on.  I also noticed that the other wheel didn’t have washer, so I left it off.

The sound kept cutting in and out after the machine warmed up.  It would be on for a half-second, off for a half-second, repeat.  I pulled out my oscilloscope and checked the inputs to the amplifier. The input signal looked fine.  I disconnected the speaker and bypassed the digital volume control just to make sure the problem was with the amp IC. It seemed it was definitely the amplifier IC.

The backboard spinner wasn’t working.  It seemed like it was jammed.  I took the motor off of the back and shot some lubricant into the gear box.  That seemed to get it working again.  For how long, I don’t know.  The owner declined to replace the motor and gearbox assembly.

The playfield lighting problems were related to a burnt connector, which I see all of the time.  I replaced both the PCB connector and the wire connector and the lighting is now working great.

I took the sound board back with me since I didn’t have an amplifier IC with me.  A few days later, I shipped the repaired board back to the owner, who installed it and said it’s working perfectly!


AC/DC Pinball Machine (Stern, 2012)

Location: Denver, Colorado.
Symptoms: Ball getting stuck at ball flap.

From talking to people who buy brand new machines, it’s not uncommon to spend some time getting it to work right.  This was my second visit to this machine.

The first visit, which I don’t think I posted, involved replacing the canon motor, filing the bushings on the bell, and getting the lock-down bar to lock.  I guess there is not any quality assurance inspection after the pinball machine leaves the production line.  The things I fixed were very obvious problems.

This visit was for a problem that wasn’t very obvious.  The ball would occasionally get stuck at the ball flap in the upper right of the playfield. After unsuccessfully trying to get the ball stuck, I resorted to just using my fingers to discover there was an electrical wire hanging down that was catching on the ball. I couldn’t see the wire, but I could feel it.

I bent the wire out of the way and the everything seemed to work fine.

acdc-0480

Black Knight Pinball Machine (Williams, 1980)

Location: Fairplay, Colorado (home of South Park).
Symptoms: Speech only, but no background sound; Multi-player bonus round not working; Some drop targets not resetting.

I tackled the sound problem first.  When I started the game the speech was working fine, but the background sound effects were not there.  I checked the connections to the speech board.  On this era of Williams machine, the analog sounds leave the main sound board and go to the adjacent speech board, where the analog sound and speech are mixed together.  Then the sound travels back to the main sound board for amplification and then to the speaker.

The connections were all good.  I disconnected the speech board and jumpered W1.  This will send the analog sounds directly to the amplifier, bypassing the speech board.  Still nothing.

With my oscilloscope, I could see the sound coming out of the digital to analog converter (IC13). From there it goes to a transistor (Q2) which acts as a current to voltage converter.  The transistor was acting like it wasn’t connected. I pulled it from the circuit and tested it with my meter and determined the transistor was bad (normally they short when failed, but this one was open).

D/A converter with Q2 transistor.

D/A converter with Q2 transistor.

I replaced the transistor, and for the first time in 5 years it made sound!

Next, I decided to check the drop targets.  A couple of the drop targets in the middle bank would pop up during reset, but would not stay there. This turned out to be a missing screw that held part of the assembly together.  I found the screw in the coin box and reinstalled it.

Next, I noticed problems with other switches in the matrix.  I removed the balls from the machine and ran the switch diagnostics.  It showed that switches 5, 13, 21, 29, 37, and 45 were all closed. They all share the same row (White/Green Row 5). so it looked like they were shorted to ground someplace.  To isolate whether the problem was in the machine wiring or with the driver board circuit, I unplugged 2J3.  The diagnostic still showed the switch row shorted to ground.  IC16 was bad.

The shorted switch row was the reason the multi-player bonus round was not working.  One of the switches in that row is the shooter lane, so the machine always thought there was already a ball there and wouldn’t deliver another to the shooter lane.

The switches all worked once IC16 was replaced.  Next I solved some minor connection issues with the flippers and G.I. lighting.  The Black Knight was ready for battle again!


Fairplay, CO, aka South Park. Cartman's face is missing.

Fairplay, CO, aka South Park. Cartman’s face is missing.


Flash Pinball Machine (Williams, 1979)

Location: Erie, CO
Symptoms: Pinball machine “goes crazy” during play.

I played the machine and the “goes crazy” aspect seemed to be something related to the switch matrix.  I put the machine in Diagnostic Mode and checked the switch status. It seemed to be a row of switches was grounding out intermittently.  The switches would work fine then suddenly there were 4 or 5 stuck switches.

I found the problem at the coin door, with one of the coin switches shorting out against the coin mechanism.  The coin switch was looking pretty beat-up because the owner, or the previous owners, didn’t know how to put Flash into freeplay mode.

With these early solid state machines from Williams, you can put the game into freeplay mode by following these steps:

  1. In game over mode, open the coin door and switch the Up/Down switch to UP.
  2. Press the Advance button.  The Credit/Ball display should show “04 00”.
  3. Keep pressing Advance until the display shows “04 18”. This is the Maximum Credits setting.
  4. In the player 1 display you should see a current value of 20 (default).
  5. Switch the Up/Down switch to Down.
  6. Press the Game Start button (not the Advance button) until the number in the player 1 display is “00”
  7. Press the Advance button, then turn off the power.  When you switch the power back on, it will be in Freeplay mode.

After fixing the short, a few switches needed cleaning and adjusting.  The machine was working fine at this point.

About 2 weeks later, I was called back because the machine was skipping balls, for example going from Ball 1 to Ball 3.  I determined that there was a really sensitive switch on the playfield causing scoring without even shooting the ball.  That, combined with a mis-adjusted ball trough switch, was causing the problem.  The trough solenoid would fire the ball to the shooter lane, and the vibration would cause the sensitive playfield switch to close causing it to score, and the ball trough switch would still be closed because the ball hadn’t left the trough yet.  The machine “thought” the ball had been shot, scored and drained all in a split second, giving the appearance that the ball was skipped.

Once the switches were adjusted, the game was working fine again.