Rush Pinball Machine (Stern, 2022)

Symptom: Node 10 failure
Location:
Fort Collins, CO

The Node 10 board in this machine has failed twice. The first failure occurred 3 months after receiving the machine. The customer obtained a replacement node board under warranty and we installed it. The Node 10 board failed again one month later. Before the next replacement board was installed, I did a forensic analysis of both the board and the machine to determine why the board was repeatedly failing.

Between reading the forums on Pinside and communication with Stern tech support, the issue appeared to be a connection being intermittently lost to one of the motors while powered up. This causes a inductive voltage spike from the motor to feed into outputs of the motor driver chip (TMC5041). This voltage spike either blows the motor driver chip or, through the internal circuitry of the chip, enters the 24 volt power supply damaging other voltage regulators (either internal to the motor driver chip or the 24 volt regulator on the node board).

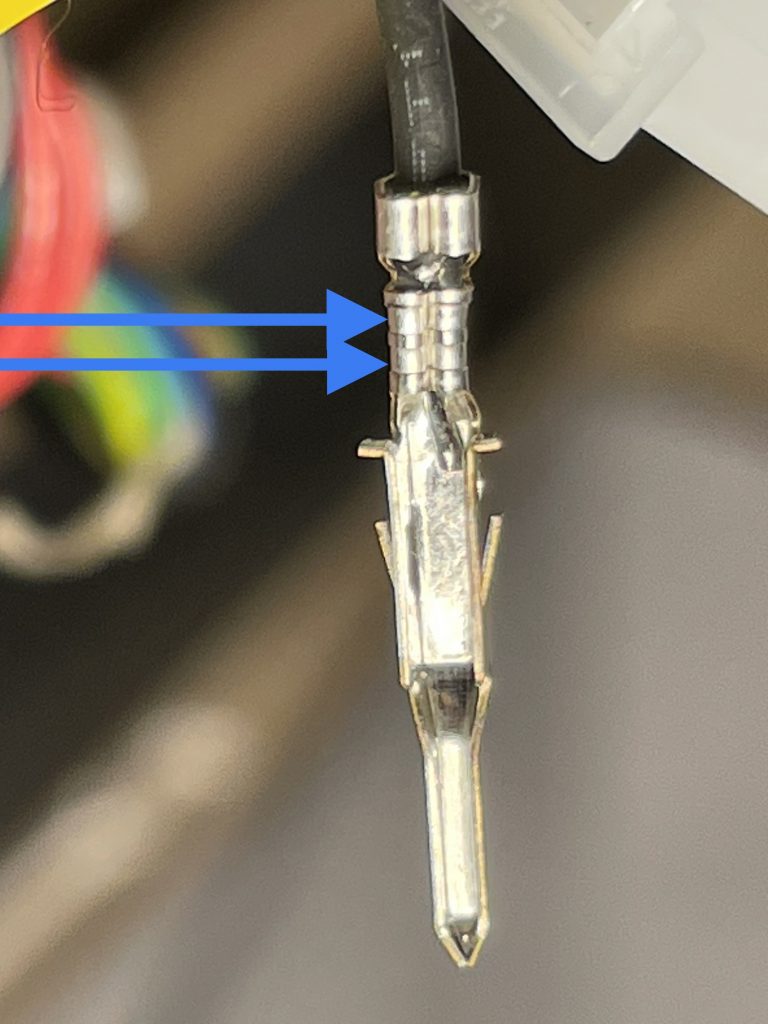
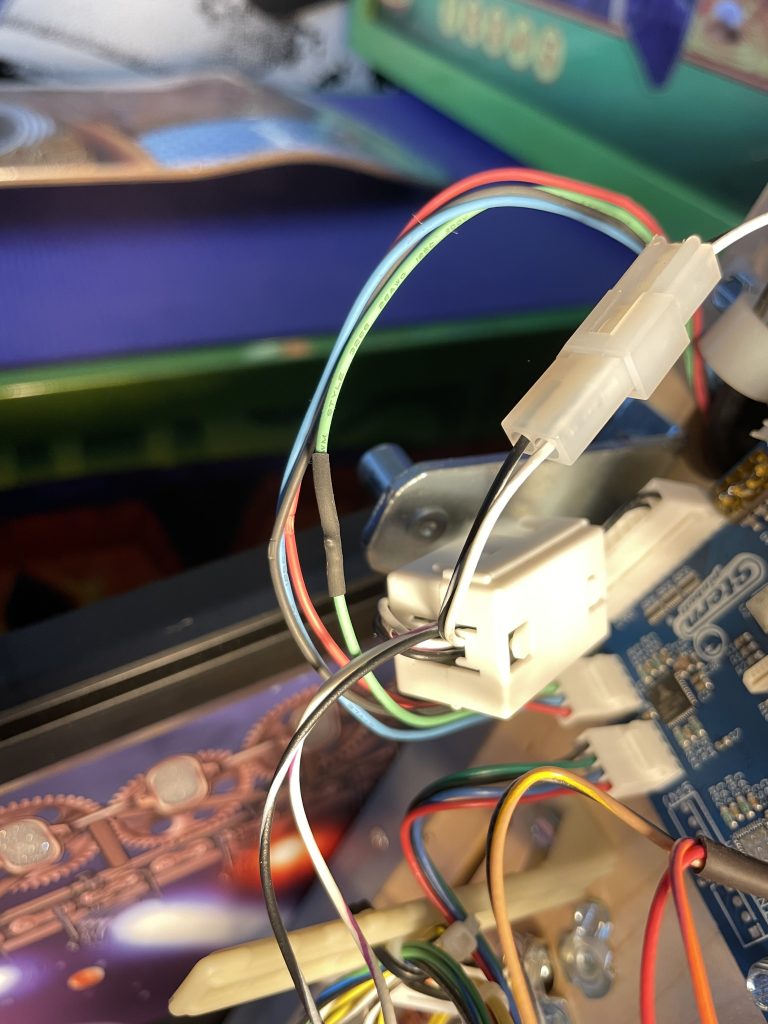
While inspecting crimp terminals in the connectors, I came across pins in the in-line connector to the ramp motor that were tinned with solder prior to being crimped. While solder is great for melting onto wires for making connections, the surface of the solder doesn’t make for a good electrical connection once it’s cooled. This was only done to the ramp motor on the in-line connector (the connector closest to the motor). Tinning the wires reduces the surface area of the crimp connection and leaves flux residue.

The in-line motor connector. It is the one closest to the ramp motor.
Connector pin showing the wire had been tinned prior to crimping.

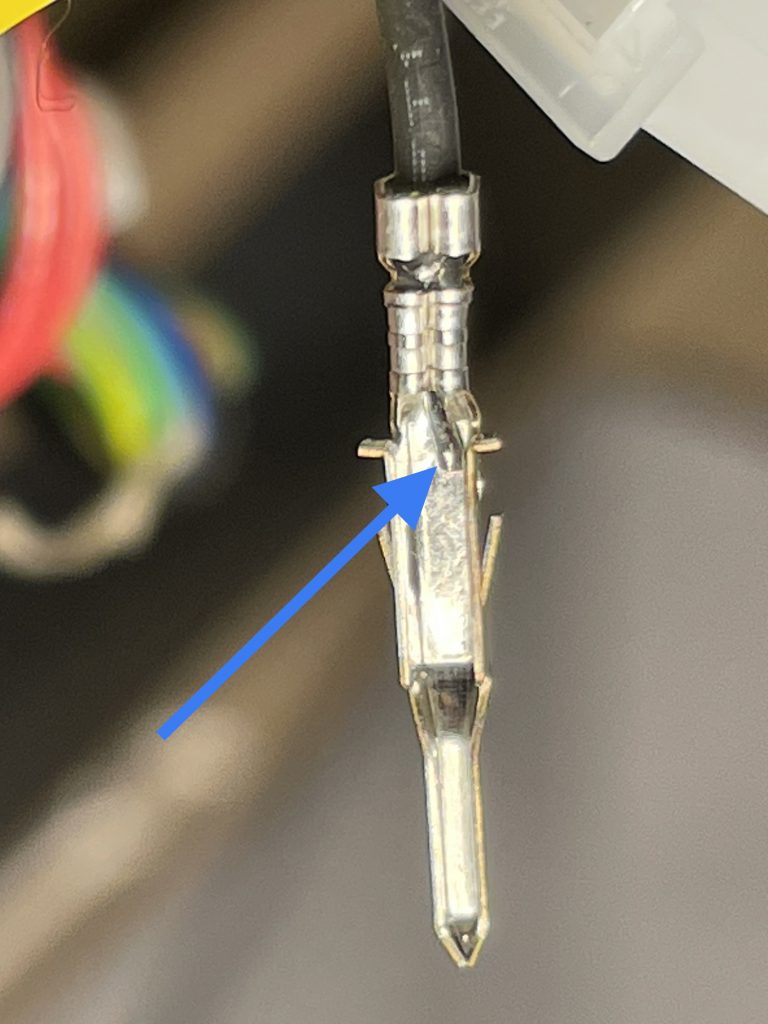
Upon further research, I have found that Stern is using the wrong pins for that motor connector. The pin shown is for a 18 to 24 gauge wire. The motor wires are 26 gauge, which is smaller. That might be why they tinned the wires before crimping — to make them slightly larger.

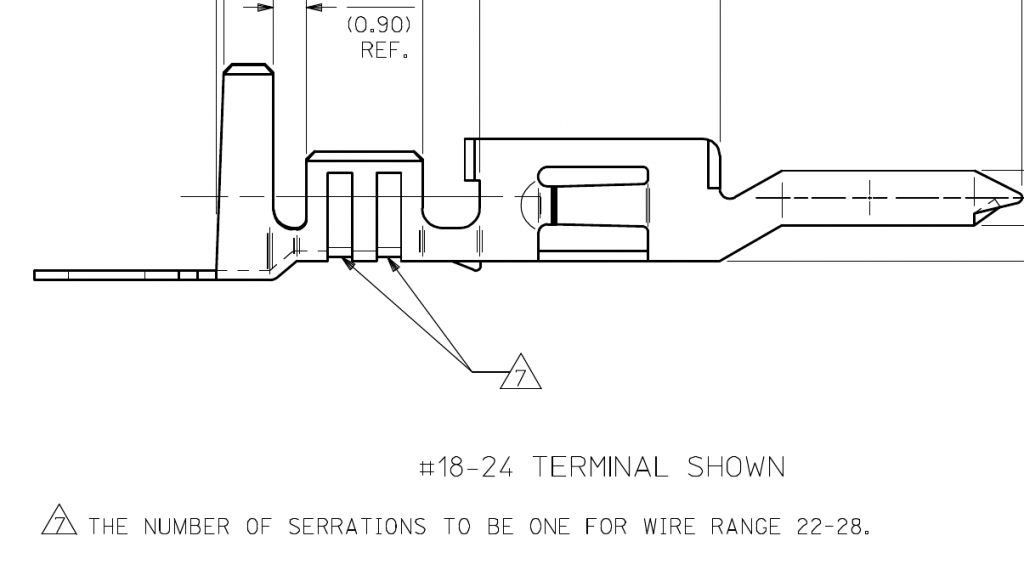
How do I know the pins are incorrect?

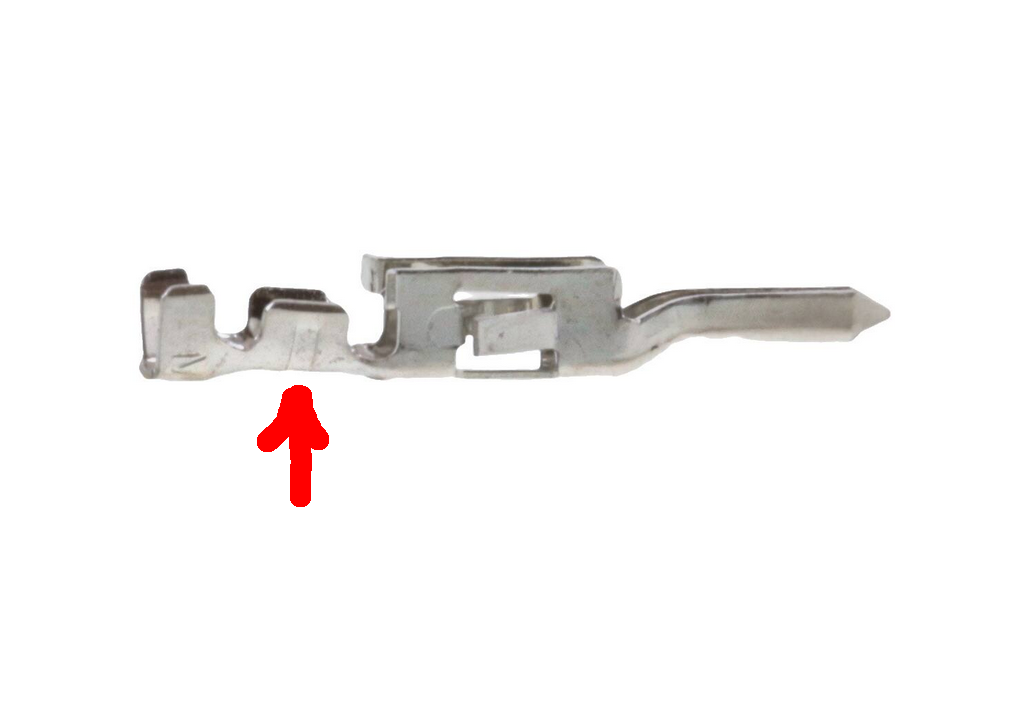
The datasheet for the pins shows there are two indentations or serrations in the crimp area for the 18 to 24 gauge pins and only one serration for the 22 to 28 gauge pins.

Excerpt from the pin datasheet, with note 7 superimposed stating only one serration on the 22 – 28 gauge version.
Same pin as above highlighting 2 serrations meaning the smallest wire is 24 gauge.
Photo of the correct 22 – 28 gauge pin having only one serration.

I believe that using the wrong pin for the type of motor wire is why there is such a high failure rate of Node 10 boards in Rush pinball machines. They’re taking a small 26 gauge wire, tinning it with solder to make it a little larger, and then using a pin for a larger 18 to 24 gauge wire. (The higher the gauge number the smaller the wire diameter.) I don’t know why they didn’t just use the proper sized pin (supply chain issues?). Based on the number of Rush machines I’ve personally looked at, the failure rate is around 20%.

I have informed Stern tech support of this issue. In the meantime, Rush pinball machine owners can get a pin extractor, remove the pins from the connector housing, and add a tiny bit of solder to the crimp area. This will ensure a good connection with the oversized pin. Of course if you’re in the Denver metro area, Peak Pinball can come to your location and take care of this.

One of the previously identified possible causes was the over-tightening of cable ties on the motor leads, which have a fairly soft insulation. I found this issue on two different Rush pinball machines located in Littleton and Lyons. However, these machines didn’t have a Node 10 failure. And the machine that did have a failure didn’t have over-tightened cable ties. But this is something to be inspected because with time, it could become a problem.

One of the motor wires to the drum clock was damaged by over-tightening of cable ties. I spliced and covered it with shrink tubing. But this is from a machine that didn’t have a Node 10 failure.

Connections aside, the elephant in the room is that Stern didn’t design the node board with protection circuitry to protect against bad connections and static electricity. In the Trinamic TMC5041 datasheet, there is a section giving advice on this.

Figure 3.5 of the TMC5041 datasheet showing example protection components not included on Stern node board.

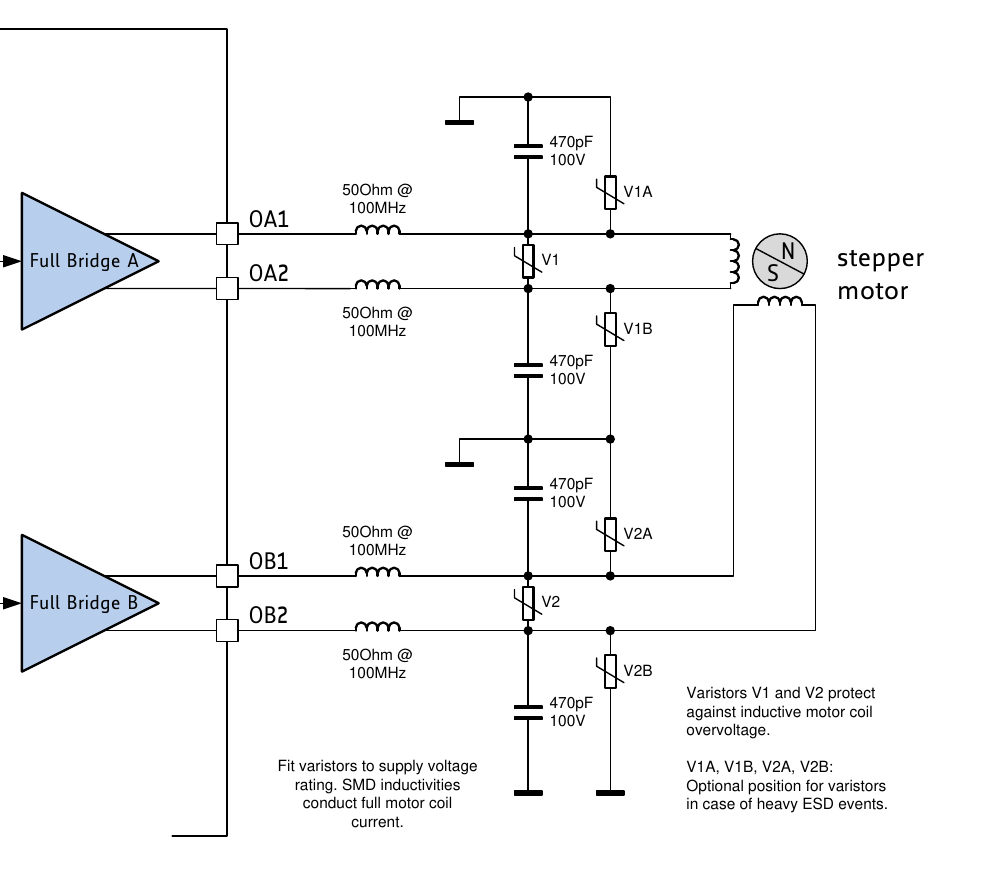
Hopefully Stern redesigns the Node 10 board with this protection circuitry.

Transformers, The Pin (Stern, 2012)

Symptom: Would not power up
Location: Firestone, CO

This is a home model pinball machine.  There is currently very little (none?) technical information about this pinball machine. It uses the Stern Spike system, which is used in some other professional machines and one other home machine (Avengers). I was unable to find any schematics for this machine or the individual boards. (I’ve read that Stern will be releasing some documentation in the near future.)

The machine would not power up. There is a 48 VDC power supply mounted inside the cabinet (you have to remove the bottom of the pinball machine to gain access to it). The 48 volts was working.

On the Spike MPU/Sound board (which is in the backbox), there are 4 LEDs to indicate the status of +48V, +24V, +8V, and +5V.  In this case the 5V LED was not lit. I found that D12 was shorted. Once D12 was removed from the board, I checked that D12 was truly shorted and it was. I also checked the pads where D12 was located, and it was still shorted there as well. This meant that the A8498 regulator chip (U30) was also bad. Once both components were replaced, I bench tested the board and all of the power status LEDs came on.

(Note: if the 5V is working, the +24V and +8V LEDs will only come on once the microprocessor has booted.  If the 5V is not working, then they will light regardless of the microprocessor.)

Stern Spike MPU board, 520-5318-01, from Transformers

The following is a more detailed look at the power section for other repair people who have the expertise to repair surface mount boards.This only covers the power sections and not any other functions such as sound, the microprocessor, or the interface circuitry.

The 48 volts from the cabinet feeds the 24 volt, 8 volt, and the 5 volt regulator sections. Each of the regulator sections utilize an Allegro A8498 chip, which is a 3 amp switching step down regulator. The enable pin (pin 2) for the 24 volt and the 8 volt sections are connected elsewhere on the board.  If the enable pin is not 0 volts, the regulator will be disabled (turned off). The enable pin for the 5 volt section appears to be grounded so that it’s always enabled.

Each regulator section consists of the A8498 (Allegro A8498SLJTR-T), a 68uH inductor, a 60V, 5 amp Schottky diode (Comchip CDBC560-G), and some input and output filtering capacitors (470uF at various voltages).  Near each regulator is a test pad where the voltage can be checked.  The 5 volt test pad is near the reset button. Note that the A8498 has a thermal pad underneath the chip which is soldered to the board. Only a hot air rework station will remove this chip.

Each regulator section consists of the following components. Refer to the A8498 data sheet for details on how things are connected together.

5 volt section: U30, D12, L8, C132, C135, C133, C134, R106, R107, R108.

8 volt section: U10, D4, L6, C55, C56, C59, C60, R24, R23, R25

24 volt section: U6, D1, L5, C47, C48, C49, C50, R125, R16, R18

The output of the 5 volt regulator goes on to power three other regulators: 3.3V (U9), 1.8V (U31) and 1.0V (U32). These regulators are Rohm BD18KA5W, BD18KA5W and BD10KA5W respectively. There are no LED status indicators associated with these regulators, however there are test pads near each one to check voltages.