Auctions and After-Market Circuit Boards

Auctions

If you’re looking for a used pinball machine, stay away from auctions. I have a number of customers who have purchased machines through various arcade related auctions that were in substantially below average condition. Perhaps the customers who get good machines from auctions don’t contact me which gives me a biased view. But the machines I have worked on that came from auctions have been atrocious (especially one with Captain in their name). Usually it’s a case of missing parts or bypassed functions so that the machine appears to be working but actually isn’t.

After-market Boards

It is usually much better to have an original circuit board repaired than it is to buy an after-market replacement. People wrongly think that if it’s new it must be better. But as more people repair their own pinball machines, the easiest thing to do is to buy replacement boards.

Over the years I’ve had a number of problems with Rottendog boards. They might be gradually improving, but I’ve had one problem after another with them. Here’s just a recent example. I recently purchased a new CPU/sound board (MPUWS) for a Sega, Lost World Jurassic Park pinball machine. Compared to the original board, a section of circuitry was omitted from the design presumably to save on cost. Needless to say, the board didn’t work in the machine. None of the optical sensors worked.

Circuitry outlined in red is missing from the Rottendog board. Most importantly the two LM339 chips on the left.
Rottendog board missing the comparator circuits (LM339) found on the original board.

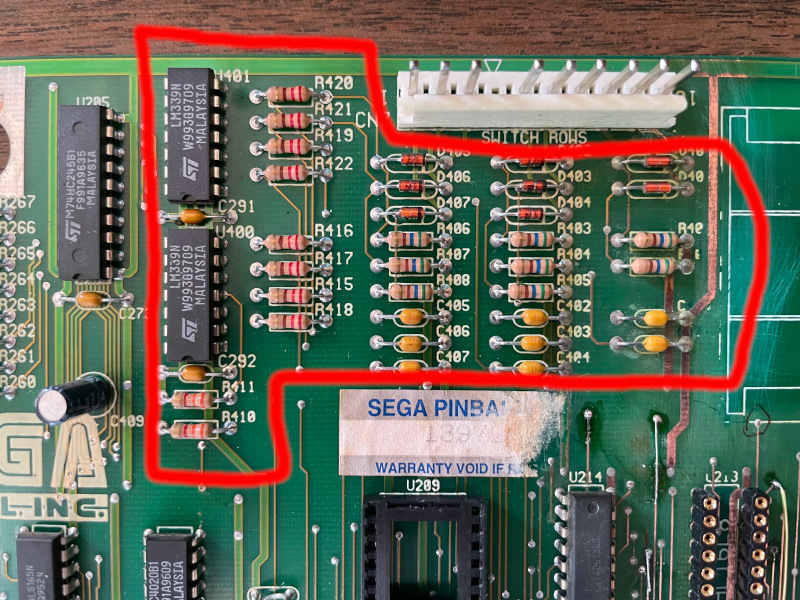
The original board was suffering from substantial battery corrosion. In the end, I ended up removing the corrosion and repairing about a dozen traces on the original board and using it instead of the Rottendog board.

Another manufacturer is X-pin. I recently worked on a Back to the Future pinball machine made by Data East. The owner had an X-pin PPB board installed. The board had shorted transistor on it. This is a really common problem in pinball machines. X-pin chose to use surface mount transistors that are not field repairable.

X-Pin uses difficult to repair surface mount transistors on driver boards.

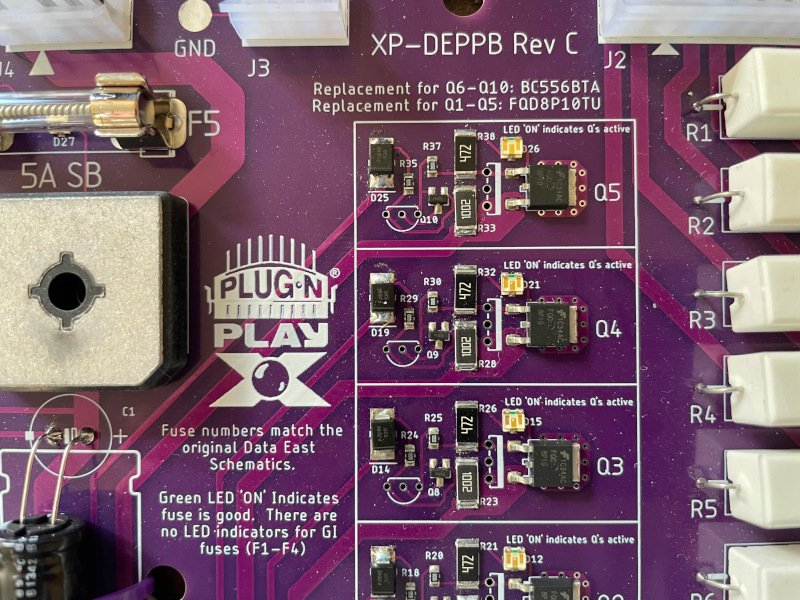
I have the special equipment to repair surface mount parts, but it’s not something I can drag with me to a customer’s home. Every pinball manufacturer uses through-hole technology in their solenoid driver circuits. Through-hole parts can easily be replaced in the field and by anyone who has decent soldering skills. The only reason X-Pin chose to go with surface mount is to save on assembly cost. I’m a former electronics engineer and have decades of experience with this.

Fortunately in this case, the owner of the pinball machine still had the original PPB board. I was able to get that up and running on the spot. I only brought back the X-pin board to my office so the owner could have a backup.

There are a few aftermarket board manufacturers that I have good experiences with. One is Alltek. They supply boards for the early solid state Bally and Stern machines. I’ve probably installed over 50 of their boards and never had a problem. Another manufacturer I haven’t had issues with is Ni-Wumpf who make boards primarily for Gottlieb pinball machines. Another is Flippp, which is a non-profit located in France which charges a little more, but they are great circuit boards. There are other manufacturers out there who provide true to original designs.

I come to my repair appointments ready to repair common problems with original boards. I don’t stock parts for the after-market boards unless they are using the same parts as the original. I don’t like it when after-market boards stand in the way of a successful repair. I only recommend using them as a last resort.

The Lost World Jurassic Park Pinball Machine (Sega,1997)

Symptom: Snagger releasing ball too early, or not lowering enough to grab ball.
Location: Lakewood, Colorado

The snagger mechanism on a Lost World pinball machine uses both optos and microswitches to determine the ends of travel.  Or more accurately, the microswitches are wired in series with the motor to cut-off the power when at one end or the other. The game MPU has no knowledge that this has occurred. The MPU instead uses the optos to determine when it is at one end or the other. So the microswitches are acting as safety switches to stop the motor if the optos fail or are unplugged, etc. The game code also has a timer to flag an error and disable the snagger if it doesn’t reach one end or the other in the allotted time.  When using the special test function in the Diag->Lost menu, the display will show the status of the optos, but relies on the switches to stop the motor at one end or the other. But during game play, the optos are used. So adjusting the switch levers had no effect.

Over time, the gears and belts develop mechanical play or slop. The original designer never accounted for this. The only adjustment is the center of travel, basically the flag that interrupt the optos. This can be loosened, rotated, and re-tightened on the motor shaft.  One could also loosen one of the pulley screws and accomplish the same thing. But this only adjusts the center of travel. If I adjusted it so that the ball would release and fall into the Jeep properly, the snagger wouldn’t lower far enough at the other end to grab the ball. If I adjusted it to grab the ball properly, it wouldn’t raise far enough and the ball would release on the edge of the Jeep and just sit there.

The largest source of play is the cam on the left side of the last hinge of the snagger.  As of this writing, Marco Specialties sells the shaft and the end housing of the snagger.  I wasn’t able to remove the last pulley due to damage of the set screw, so replacing it wasn’t an option.

What is really needed is a way to move one of the optos so that the motor runs a little bit longer to account for the slack in the mechanics.

I removed one of the optos and with a very small Dremel bit, created slightly curved slots for the opto leads in the circuit board. This would allow for the opto to be adjusted.

Showing new position of opto before final adjustment in the machine.

Added wires to leads to allow for movement

After determining the ideal position for the opto and adjusting the center travel (as mentioned above), I put a little drop of hot-glue on the top side of the board at the end of the opto to hold it in place.

The snagger now works perfectly.  Not the prettiest solution, but sometimes things need a slight design tweak. If there were more Lost World machines out there, I’d design an aftermarket board that would make this a lot easier.

Reset issues on pinball machines

Often people will contact me about reset issues with Williams pinball machines, primarily associated with the WPC era from the early 1990’s. I presume they do a little searching around the internet and come to the conclusion this is a real common problem, solved by replacing BR2 (bridge rectifier) and C5 (filter capacitor).

What happens is that many people will attempt to shotgun these parts (shotgun means to replace without knowing if they are in fact defective).  Some of these people will have limited de-soldering experience, and end up damaging their Power/Driver board.

In my professional experience (30+ years), my opinion is that there is no common Williams reset problem.  Reset issues can occur in all solid state pinball machines (even on some EMs) and all brands, and it can be caused by many different things, most of them related to the power chain. When the voltage drops below a threshold, the circuitry is designed to reset the pinball machine.

I’m all for people repairing their own machines, and I’m happy to help and teach them.  But shotgunning parts on a printed circuit board is usually not good for the board.  The heat and physical stress from de-soldering a part will usually lift the copper pads or traces from the fiberglass, or pull out the metal plating that is inside the hole that the component pin is going through.

If you have a reset problem, get the correct diagnosis before swapping out parts.

With my oscilloscope, I can check BR2/C5 in about 60 seconds.  It’s immediately apparent when the bridge rectifier is defective; the pulsating DC will only have every other pulse showing.

Here are some reset issues I’ve worked on, and what the problem ended up being:

  • Independence Day (Sega):  This is one of the very few that ended up being the bridge rectifier.  In the case of Sega, it’s called BRDG21.


  • White Water (Williams): The owner was having a reset issue and had read about BR2 being the culprit.  He wanted me to verify that BR2 was defective. It turned out that it had already been replaced, along with C5. While I was at his home, the basement lights dimmed when the furnace blower switched on.  I suspected an issue with the house wiring (it was an old house).  He turned on other appliances and the line voltage reading dipped down to about 105 volts.  I suggested he try a uninterruptable power supply (UPS), normally used for computers, to handle these brownouts.


  • Black Knight (Williams): The basement of this home was wired with ground fault interrupters (GFI) after a flood.  Most pinball machines won’t work with a GFI.


  • Star Trek: The Next Generation (Williams): Reset issues on this machine were only in the first few minutes of power being turned on.  I replaced the inrush current limiter (varistor in the power switch box).


  • Starship Troopers (Sega): Resets were pretty random, but grouped together.  I traced the problem back to the F23 fuse.  It was loose in the fuse clips and running very hot.  I tightened the fuse clips and reinstalled the fuse.


  • Twilight Zone (Bally/Williams): The reset problem was caused by bad solder connections on the 5 volt regulator. The 5 volt regulators run very hot on Twilight Zone machines and the solder tends to get fatigued due the high temperatures. The old solder was removed from the pins and new solder was applied. The ground on the 5 volt regulator is connected to the circuit board with some screws. These screws were showing signs of rust and were replaced as well.


  • Twilight Zone (Bally/Williams): The reset problem was caused by the power connector, where the 5 VDC leaves the Power/Driver board at J114.  The insulation displacement connectors (IDC) have metal forks which pierce the insulation of the wire to make a connection with the copper inside.  These connectors are problematic due to the wire working loose due to vibration and movement.  I re-seated the wires into the connector and the problem was solved.


  • Doctor Who (Bally/Midway): same problem as Twilight Zone above, except at connector J101, where the low voltage AC power enters the power driver board before going to BR2.


This is just a sampling, but failures of BR2 are not as common as some people think. Also, I have yet to see a case where C5 was weak or needed to be replaced.

Golden Eye, Sega/Stern Pinball Machine (1994)

Location: Centennial, CO
Symptoms: Auto-launch ball shooter would not launch ball.  Lower playfield lights not working.

I opened the coin door on the pinball machine and immediately saw a coil dangling from the playfield.  It was the shooter coil and it was resting on the metal junction box.  It probably grounded out against the box causing the 50V supply fuse to blow.

The coil bracket had broken from the stresses and vibration of years of use.

The lower playfield general illumination lights were not working. I suspected a connection problem on the IO Power/Driver board.  I couldn’t find any problems with the connector. The lights started working momentarily on their own.  I could hear a faint buzzing that seemed to be emanating from the fuse.  I tapped the fuse and the buzzing would change. I removed the fuse and tested it.  It wasn’t blown, but there was a connection problem inside of it (more on fuses here).  I replaced it and the lights began working reliably.

Once the lights and the shooter coil were fixed, I played a test game and discovered a playfield ramp switch that was dangling with nothing holding it. I wasn’t able to locate any screws lying in the cabinet.  So I reattached it with a new screw.

Sega South Park Pinball Machine

Symptom: It would shoot two balls into the shooter lane.

At first look, the playfield switch in front of the plunger was badly bent and not reliably sensing a ball.  I assumed this is why it was loading the shooter lane with two balls.  As I tried to straighten out the switch wire, it broke.  I repaired the switch with some piano wire (I guess it’s steel wire) that I obtained from McGuckin’s Hardware store, and epoxied the wire on to the switch lever.

As I investigated further, I discovered the reason the switch wire was bent was because the one-half of the fork was broken off the auto launch kicker (500-6091-00).  When ever the auto launch mechanism shot the ball, it would jam the ball sideways.

Broken Auto-Launch Kicker

Broken Auto-Launch Kicker


I found the broken piece down in the bottom of the cabinet. The owner took it to a nearby muffler shop and they welded it back together.  With the switch replaced, and the arm welded back on, I fired up the machine to find it still deposited two balls into the shooter lane.  The playfield switch was functioning correctly.  After another 15 minutes, I realized there were 6 balls loaded into the machine, when there should only be 5 balls.  It never is what you think.   The other stuff needed repairing even though it wasn’t the original problem.

Replaced many bulbs.

Location: Superior, Colorado